

创建tceml.py文件,内容如下:
# -*- coding: utf-8 -*-
#!/usr/bin/env python3.9


from email.mime.multipart import MIMEMultipart
from email.mime.text import MIMEText
from email.mime.application import MIMEApplication

import optparse
import sys

def create_eml(text_content = "this is a test mail !", url_lst = None, athm_lst = None, **headers) :

    # 1、创建一个混合型的 MIME多部分数据
    eml_mixed = MIMEMultipart('mixed')
    # 1.1、header处理
    for key, value in headers.items() :
        eml_mixed[key] = value

    # 2、创建一个可替换的 MIME多部分数据
    eml_cnt = MIMEMultipart('alternative')

    # 2.1、文本数据处理
    part1 = MIMEText(text_content, _subtype='plain', _charset="utf-8")
    eml_cnt.attach(part1)

    # 2.2 创建一个html格式的内容给 eml_cnt,有URL,打上URL链接
    if url_lst is not None and len(url_lst) >= 1 :
        i = 0 ;
        html_content="<html><body><p>URL测试邮件</p>"
        for url in url_lst :
            i+=1
            a_tag = "<p><a href=\""+ url +"\">测试链接"+ str(i) +"</a></p>"
            html_content += a_tag
        html_content += "</body></html>"
        part2 = MIMEText(html_content, _subtype='html', _charset="utf-8")
        eml_cnt.attach(part2)

    eml_mixed.attach(eml_cnt)

    # 3、逐个添加附件
    for athm in athm_lst :
        with open(athm, "rb") as fd :
            # 3.1、添加附件数据
            athm_part = MIMEApplication(fd.read(), _subtype="plain")
            # 3.2、添加附件数据的头部说明
            filename = athm.split("/")[-1]
            athm_part.add_header('content-disposition', 'attachment', filename=filename )
            # 3、逐个添加到 eml_mixed 中
            eml_mixed.attach(athm_part)

    # 转换成string返回
    return eml_mixed.as_string()


# input : aaaa@aaa.com,bbbb@bbb.com,ccc@ccc.com
# output : aaaa<aaaa@aaa.com>,bbbb<bbbb@bbb.com>,ccc<ccc@ccc.com>

def mail_account_create(account_str) :
    if account_str == None or len(account_str) == 0 :
        return None
    dst_lst = []
    acc_lst = account_str.split(",")
    for account in acc_lst :
        nick_name = account.split("@")[0]
        dst_lst.append(nick_name+"<"+account+">")
    return ",".join(dst_lst)


if __name__ == "__main__":
    argsParser = optparse.OptionParser( usage='Usage: createEml.py [options] -t type -f file -i project-id', prog='PROG', conflict_handler='resolve' )
    argsParser.add_option( '', '--help', action='store_true', dest="help", default=False, help='dispaly help usage' )
    argsParser.add_option( '-t', '--type', dest="type", default=-1, help='type : athm=1 url=2 text=3' )
    argsParser.add_option( '-e', '--element', action='append', dest="ele", default=None, help="the data element" )
    argsParser.add_option( '-o', '--output', dest="output", default=None, help="the eml write to the file" )
    argsParser.add_option( '', '--from', dest="from_", default="from@from.com", help="the eml file 'from' data" )
    argsParser.add_option( '', '--sender', dest="sender", default="sender@sender.com", help="the eml file 'sender' data" )
    argsParser.add_option( '', '--subject', dest="subject", default="这是测试邮件主题", help="the eml file 'subject' data" )
    argsParser.add_option( '', '--to', dest="to", default="to@to.com", help="the eml file 'to' data" )
    argsParser.add_option( '', '--cc', dest="cc", default="cc@cc.com", help="the eml file 'cc' data" )

    (options, args) = argsParser.parse_args(list(sys.argv))

    if options.help == True or options.type == -1 or options.ele == None or options.output == None :
        argsParser.print_help()
        sys.exit()

    athm_lst = []
    url_lst = []
    text_content = "this is a test mail !!!"

    from_ = mail_account_create(options.from_)
    sender = mail_account_create(options.sender)
    to = mail_account_create(options.to)
    cc = mail_account_create(options.cc)


    if options.type == '1' :
        athm_lst = options.ele
    elif options.type == '2' :
        url_lst = options.ele
    elif options.type == '3' :
        text_content = '\n'.join(options.ele)

    data = create_eml( text_content, url_lst, athm_lst, Subject=options.subject, From=from_, Sender=sender, To=to, Cc=cc, X_ddd="自定义自定义" )
    with open(options.output, 'w') as fd:
        fd.write(data)
执行脚本:
python3.9 crteml.py -t 1 -e /etc/os-release -e /etc/services -o 123.eml –from ff@ff.com –to to@to.com,tt@tt.com –sender ss@ss.com,sd@sd.com –subject “ssssssssssss”
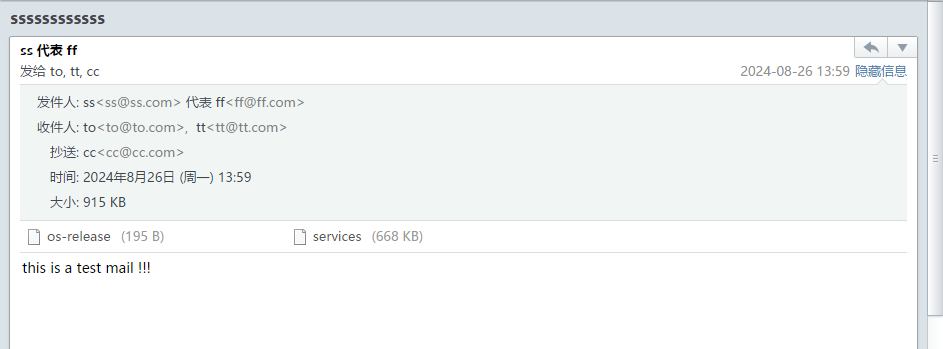
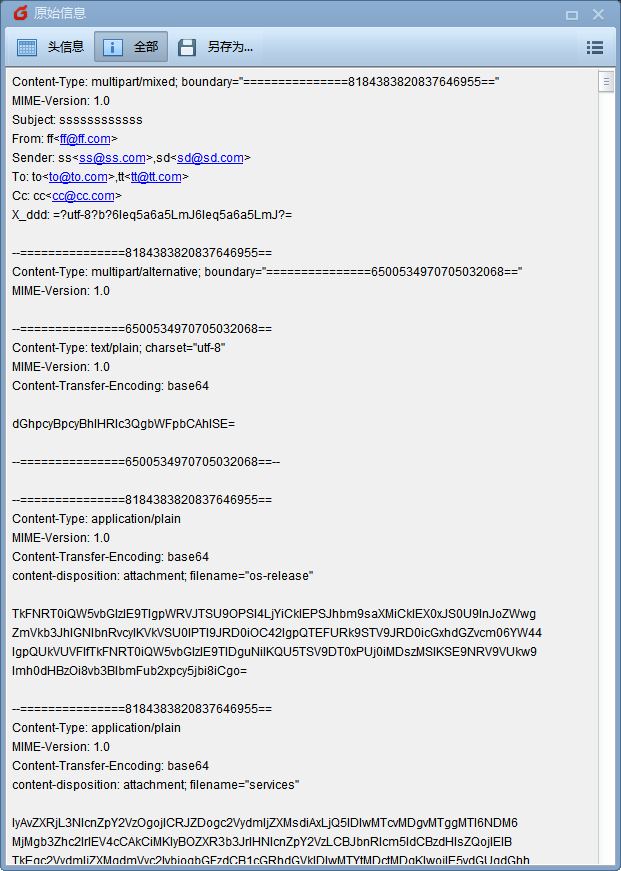
测试结果如下:
生成了 123.eml 文件,可以用 foxmail 或者其他查看邮件的工具打开。
发表回复